Tube vs Tubeless Tires
Here at Bikes Palm Beach, we get this question a lot: “Which tire system is better: tube vs tubeless tires?” This question is usually followed up by additional questions to understand where they like to ride, what types of bikes do they ride, and do they ride for leisure, fitness, and/or performance. Below, we’ll dive a little deeper into the tubeless tire system, how it differs from using tubes, and how to set it up on your own bike.
What is tubeless?
A traditional wheel setup (not tubeless) uses a clincher system requiring an inner tube because the tires are not airtight. When inflated, the inner tube pushes the tire bead against the wheel’s rim walls and secures the tire in place.
A tubeless tire system holds air pressure without the use of an inner tube. It uses tubeless-ready tires and wheels with tubeless sealant. Tubeless-ready tires hold air pressure because there is a tight seal at the bead of the tire against the tubeless-ready rim and at the valve hole with a tubeless-ready valve stem. Tubeless sealant seals the tire’s porous casing. It also seals small punctures caused by debris you encounter as you’re riding.
Benefits of going tubeless
Mountain bikers will agree that going tubeless is one of the biggest game changers for the sport in recent years. Nowadays, tubeless is the standard for mountain and gravel biking, and most of these bikes are equipped with tubeless-compatible wheels, tires, and a bottle of sealant right out of the box. Road cyclists have also taken to utilizing tubeless tire set-ups to improve performance and reliability.
Lower air pressure
A tubeless setup allows riders to run lower air pressure because there is decreased risk of encountering a pinch flat like you would with tubes. Pinch flats occur when the inner tube is compressed tightly between the tire and rim during forceful impact.
On loose terrain, off-road riders have more confidence, grip, and speed by running lower tire pressures with a tubeless setup. Tires offer more traction and control, responding better to the terrain when they’re at lower pressures. This can even reduce rolling resistance on rougher surfaces. However, be aware not to run tire pressure too low, because frequent hard impacts against the rim can weaken the strength of the tire and cause a blowout.
Fewer flats
Tubeless sealant can help prevent flats. Glass, rocks, thorns, and other debris can puncture the tire, but the tubeless sealant will coagulate in the puncture and seal it from losing air.
Tubeless for roadies
For roadies, eliminating the tube can offer some weight savings. More importantly, it decreases rotating weight at the outside of the wheel, improving pedaling and acceleration. Rolling resistance on road tubeless tires is lower than that of both clinchers and tubulars because the friction between the inner tube and the casing is eliminated.
How to identify tubeless-ready wheels and tires
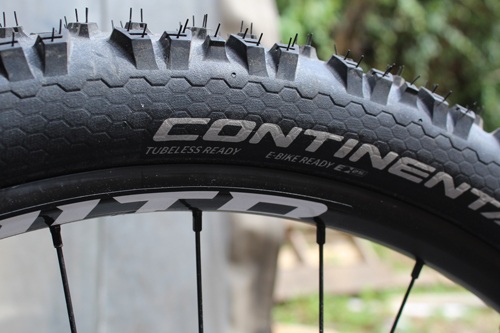
Tubeless systems require tubeless-ready wheels and tires. The interface between tubeless-ready wheels and tires is developed to be completely air-tight. Therefore, to function properly, tubeless-ready rims require non-porous rim tape. This base protection will not absorb sealant and will make the rim air-tight. Most tubeless-ready rims will have the rim tape already installed. The sidewall of the tubeless-ready rim features a hooked design, which helps catch and hold the bead. The shape forces the bead up snugly against the outer hook and has a deep section in the middle to make it easier to remove.
A tubeless-ready tire will have higher-density beads that are more square-shaped and will fit tighter against the rim. Tubeless-ready tires will have an indicator on the sidewall indicating “TLR” (tubeless ready), “TC” (tubeless compatible), or “UST” (Uniform System Tubeless standard).
When you purchase a new higher-end mountain bike, it may already be set-up for tubeless with sealant in the tire instead of a tube. To be sure, ask the staff of the bike shop where you’ve purchased it.
Setting up the tubeless system
The initial setup can seem overwhelming the first time you do it. But there are just a few steps and it does not require additional tools. The important thing is to ensure you have the proper supplies. If you do encounter any questions or decide you’d rather leave it to the experts, bring your bike to our store, and we’ll verify you have the right wheels, tires, and supplies to get set up. We can even set it up for you for a reasonable installation fee.
-
 Quick View Select options
This product has multiple variants. The options may be chosen on the product page
Quick View Select options
This product has multiple variants. The options may be chosen on the product page
Trek Rail 9.8 GX eMTB
$8,499.99 -
 Quick View Select options
This product has multiple variants. The options may be chosen on the product page
Quick View Select options
This product has multiple variants. The options may be chosen on the product page
Trek Fuel EX 9.8 XT
$6,249.99 -
 Quick View Select options
This product has multiple variants. The options may be chosen on the product page
Quick View Select options
This product has multiple variants. The options may be chosen on the product page
Trek Top Fuel 9.8 GX
$5,899.99 -
 Quick View Select options
This product has multiple variants. The options may be chosen on the product page
Quick View Select options
This product has multiple variants. The options may be chosen on the product page
Trek Top Fuel Custom XS
$3,999.99

Tools and supplies needed
- Sealant
- Sealant injector (looks like a big syringe with a hose)
- Pump
- Tire levers (optional)
- Tubeless valves (be sure to get a set that fit snugly with your specific rim’s profile. Also, you want the kind with removable core)
- Valve core remover
- Rim tape

Verify your wheels and tires are tubeless-ready
- Verify that your tubeless-ready wheel is properly taped with tubeless tape. If there are gaps or areas where the tape has moved, lifted away from the rim, or been cut, you need to retape the rim.
- Check that the tubeless valves are installed. A tubeless valve looks similar to and operates the same as a standard Presta valve. But, instead of being attached to a tube, there is a rubber base on the valve that keeps it airtight within the valve hole of the rim. Tubeless valves require a nut that threads onto the body of the valve. This nut should be finger tightened to the rubber base against the valve hole.
- All surfaces (tires, rims, and tape) need to be clean and free of any debris. If you’re pulling out the tube and going tubeless on your current rims and tires, remove all dirt and grime and then wipe with rubbing alcohol and dry everything.
Mounting tubeless tires
You can install most tubeless tires with a standard floor pump. However, some tires can be stubborn and may require for airflow in order to properly seat on the rim. In this case, you may need an air compressor or a standard floor pump with a charger, or a pressurized chamber that you pump up and release in a blast all at once into the tire, forcing it to seat on the rim. You can also achieve this with a CO2 cartridge and inflator.
The first step is to insert the valve stem into the rim. Hand tighten the nut against the rim. Remove the valve core using the valve core remover tool.
Next, seat one side of the tire on the rim bed. Be sure to center the tire’s brand logo with the valve stem. Also, keep in mind that mountain bike tires are directional, so be sure it’s facing the right direction (check the sidewall for an indicator). Some tires are specifically designed for front or rear usage, so be sure to check.
From the opposite side of the valve stem and moving your hands equidistance around the tire, seat the other side of the tire on the rim, too, ensuring that your other hand keeps the seated side in place.
-
 Quick View Select options
This product has multiple variants. The options may be chosen on the product page
Quick View Select options
This product has multiple variants. The options may be chosen on the product page
Pinarello X7 Shimano Ultegra Di2 Road Bike
$8,800.00 -
 Quick View Select options
This product has multiple variants. The options may be chosen on the product page
Quick View Select options
This product has multiple variants. The options may be chosen on the product page
E-BIKE Road 56 Large Cervelo Rouvida Rival XPLR AXS 1 Plasma Blue
$7,500.00 -
 Quick View Select options
This product has multiple variants. The options may be chosen on the product page
Quick View Select options
This product has multiple variants. The options may be chosen on the product page
Cervelo S5 SRAM Red eTap AXS
$13,000.00 -
 Quick View Select options
This product has multiple variants. The options may be chosen on the product page
Quick View Select options
This product has multiple variants. The options may be chosen on the product page
Trek Domane SLR 9 AXS
$13,199.99
Inflating tubeless tires
Inflate the tire using the floor pump until you hear the tire’s bead seat into place. It’s typically two loud popping sounds. Remove the pump from the valve. The tire will deflate. You will reinflate it after the sealant is added.
Fill your sealant injector with the correct amount of sealant needed per tire (check the manufacturer’s suggested amount in the instructions). Screw the hose onto the valve stem and inject the sealant into the tire.
Reinsert the valve core into the valve stem and hand tighten using your valve core remover tool. Finally, pump up the tire to your preferred tire pressure, install the wheels back onto your bike and go for a test ride. The sealant needs to move around the inside of the tire to do it’s job, so the best thing to do is spin those wheels.
Maintaining your mountain bike’s tubeless tire set up
Adding sealant to your tires can be done by either the direct pour or the valve injection method. Over time, the tubeless sealant in your tires will begin to dry out and lose its efficacy, so plan on refreshing your sealant quarterly (approx. every three months). This little bit of preventative maintenance will ensure that your tubeless system is always running properly.
How to repair a flat on your bike’s tubeless tire set up
Though tubeless systems are effective and reliable, they are not invincible. Flats and punctures can still happen. For most recreational riding, it’s still best to carry a flat repair kit that includes a traditional inner tube.
Tire plugs
Tire Plugs are a good option to repair tire punctures that tubeless sealant is unable to seal. Sometimes, if you plug a tire properly, an inner tube is unnecessary. There are many popular tire plug options on the market. Stop by Bikes Palm Beach for a recommendation.
Troubleshooting
If your mountain bike’s tubeless tire system is chronically losing air, there may be a problem with your seal. It could be a leak in the valve, improper tire seating, or issues with your rim tape. Bring your wheel to Bikes Palm Beach if you need help troubleshooting your set up.
Featured Bikes in Stock
-
Quick View Select options
This product has multiple variants. The options may be chosen on the product page
Trek Rail 9.8 GX eMTB
$8,499.99 -
Quick View Select options
This product has multiple variants. The options may be chosen on the product page
Trek Fuel EX 9.8 XT
$6,249.99 -
Quick View Select options
This product has multiple variants. The options may be chosen on the product page
Trek Top Fuel 9.8 GX
$5,899.99 -
Quick View Select options
This product has multiple variants. The options may be chosen on the product page
Trek Top Fuel Custom XS
$3,999.99
-
Pinarello Nytro Gravel Force E-Bike
-
 Quick View Select options
This product has multiple variants. The options may be chosen on the product page
Quick View Select options
This product has multiple variants. The options may be chosen on the product page
Cervelo Aspero Rival XPLR eTap AXS
$5,499.99 -
 Quick View Select options
This product has multiple variants. The options may be chosen on the product page
Quick View Select options
This product has multiple variants. The options may be chosen on the product page
Cervelo Aspero-5 105 Custom
$5,999.99 -
 Quick View Select options
This product has multiple variants. The options may be chosen on the product page
Quick View Select options
This product has multiple variants. The options may be chosen on the product page
Trek Checkpoint SL 5 Gravel Bike
$3,399.99

-
Quick View Select options
This product has multiple variants. The options may be chosen on the product page
Pinarello X7 Shimano Ultegra Di2 Road Bike
$8,800.00 -
Quick View Select options
This product has multiple variants. The options may be chosen on the product page
E-BIKE Road 56 Large Cervelo Rouvida Rival XPLR AXS 1 Plasma Blue
$7,500.00 -
Quick View Select options
This product has multiple variants. The options may be chosen on the product page
Cervelo S5 SRAM Red eTap AXS
$13,000.00 -
Quick View Select options
This product has multiple variants. The options may be chosen on the product page
Trek Domane SLR 9 AXS
$13,199.99


